Did you know we are an Agency Approved partner with ManyChat.
What’s Manychat?
Manychat is a chatbot platform that allows you to easily create automated chat interactions that can be used to answer questions, build leads, even sell products or services.
Let me break it down for you a little bit further. Currently, the most common type of chatbots we are building for our clients are Facebook Messenger chatbots. Really what this comes down to is building a structure for automated interactions or conversations that a company or individual can have with an audience directly within Messenger.
Here are a few ways you can use a chatbot for your business:
? You can create a chatbot to answer frequently asked questions.
? You can help a customer find the right product or solution they are looking for, quickly. An example is helping a customer choose the right size and type of shoe from a selection from your online store.
? You can build a list of subscribers (similar to collecting email addresses for a mailing list) to send customers news or updates. An example is sending an automated update to let people know when your yoga studio is open, when you next class or workshop is available, if you have a special sale or promotion running, etc..
? You can use a chatbot with Facebook posts to educate and promote a new product or service and/or help increase engagement.
? You can use a chatbot to learn more about your customers. Consider a bot that can ask customers questions or share information about their likes and interests which can help you serve their needs better (and you can collect all this data)!
? You can use a chatbot to collect leads. We have created chatbots for a real estate agents to help them find customers looking to sell their house in the near future and also find buyers interested in a property listing they had for sale.
There are so many opportunities…and that’s what we love about chatbots and ManyChat. We are excited to be able to help our clients grow and expand their business with the use of chatbots and are excited to share more examples, videos and ideas as we continue to work with more an more clients.
If you have any questions, reach out in the comments below. I’d love to chat (get what I did there) with you about Messenger chatbots.
One of the best strategies to increase engagement through Stories on Instagram is by ASKING FOR A COMMENT!
Seems obvious but it works.
If you don’t actually ASK people to take an action – to ASK your fans and followers to leave you a comment, you are less likely to GET a comment. Whether your story post is a series of images or video, remember to ask your fans to take that action and “comment below”.
Try it. What have you got to lose? You may just be surprised after doing this a couple times your engagement will start to increase and you will start building a personal connection with your followers through interactions and engagement through Instagram comments.
Are you a restaurant owner or operator Looking to spice up your social media posts? Give these ideas a try:
1) Highlight your repeat customers. Post a picture of a loyal customer and thank them for supporting your business. As they are already a loyal customer there is a really good chance they will share your post – that allows you to reach their fans and followers. An endorsement from a friend is more likely to gain awareness and interest for your business compared with a cold ad pitching your business.
2) Post a limited time offer. One way to gain attention is to post a special offer for your fans/followers. Include a couple rules for people to follow which include how to share the post with a friend, tagging someone, or including a deadline for the special offer (IE – today only OR buy one get one free (of something on your menu).
3) Share photos and video of your food or the vibe at your restaurant. People love to see what the experience is at your location. Show them through your social posts and build that FOMO style which may attract them to check it out.
Give these ideas a shot and see how this allows you to spice up your posts and build more engagement.
Are you a Real Estate Agent or Broker?
Have you considered using Facebook Ad to help you promote your listings and sell properties fast?
Here are two Facebook Advertising ideas we have used to help drive traffic, build a list of interested buyers and sellers, and helped our real estate clients reach more people in a cost effective way:
1. Carousel Style Ads. A carousel style ad is an ad that features multiple images where you can either tap or swipe to see more pictures in the ad. This is a great idea if you have multiple listings to promote or if you want to feature one property and show different pictures of various rooms or highlighted features of that property. Along with each image you can include a brief text heading to point out something of interest. You can include a separate link per image to help drive traffic to your website.
2. Lead Gen Ads. One of the most valuable things to be able to collect is an interested parties name, email address and phone number. One style of Facebook & Instagram ad to test is a Lead Gen ad. This is an ad where you can feature a property with one or more pictures, but instead of driving people off of Facebook to a website/landing page, you can drive them directly to a lead contact form right on the ad. This eliminates an extra step and allows you to gather contact information right away while someone is interested. This also allows you to see your return on ad spend (ROS) because you can track the amount you have spent on your ad campaign, see how many leads you attract with your ad and get an exact cost for each lead. This is valuable information.
There are many other ad types that can allow you to promote listings, capture lead information and/or engage directly with potential clients. If you haven’t tried these options yet, this is where I would start. If you have tried these and are ready to dive even deeper, stay tuned as I’ll share more ideas in future posts.
If you are looking to get started with Facebook & Instagram ads but you don’t know how, give me a call. I’m ready to help you grow leads, traffic and sell your properties fast.
Post a message below or contact me at 416-398-6669.
Are you considering advertising on Facebook and Instagram? One of the most important elements to a successful advertising campaign is the audience you target your ads to. Here are 3 tips to help you target your ads to people who are not only interested but ready to take action.
1. Consider who your “warm” audience is. A warm audience are people who already know, like and trust you. These could be current or past clients/customers, friends, family or your current social followers. When setting up audiences in Facebook Business Manager, these would be audiences you setup as either Fans/followers of you Facebook page, Instagram account or they could be from email lists you upload. Hopefully you have contact information from current and past clients. If not, now is the perfect time to start preparing this. Your warm audience should be your first and most valuable audience as these are people who have either already purchased from you or you already have trust with. They are more likely to buy from you again.
2. Now let’s get a bit deeper. If you have your warm audience prepared, depending on the size of that audience it might be a good idea to try to break that out between people who have purchased from you and people who haven’t. As mentioned above, people who have purchased from you once, are more likely to purchase from you again compared to someone who doesn’t even know you. Sometimes though, you may be starting to build that trust with people. They are interested in you, follow you on your social accounts, maybe even engage with you on social, but they haven’t yet made a purchase from you. They are in this middle phase. You are starting to build interest an loyalty with them, but they haven’t yet taken that extra step to be a customer. When in comes to Facebook marketing being able to separate this audience out from people who are truly warm or hot can make a difference. This audience needs that extra push. Maybe a special offer or discount, maybe a different video to demonstrate your product or service. Breaking this audience out may help you push them down your marketing funnel to that next level.
3. Cold Audience. A cold audience is an audience who may not know you or have heard of you before. But let’s make sure we don’t get too cold here. You don’t want your ads targeting just anyone. You want to make sure there is a level of interest here. You just may not have previously been able to reach this audience to attract their attention. This is where we need to dive into other broad interest targeting with Facebook’s categories. Here is an example. Let’s say you operate at local business – maybe a restaurant. Consider the type of food you serve at the restaurant, consider other popular restaurant names that are similar, consider other interests your customers have. Do they have a similar lifestyle, do they shop a certain stores, are they more likely to shop at other stores in your area if it’s a family restaurant, what other things do they do with their family? Drilling down to consider elements of interest in your target customer will help you better target them on Facebook and Instagram. If you can target them with laser focus, you can test different audience interests and see if you can reach your audience based on actions they take on your ads.
If you are ready to get started with Facebook & Instagram Advertising but don’t know how to setup audiences, don’t know how to setup ads or are looking to get BETTER results from your ads we are here to help!
Did you know we are Facebook Advertising Experts? Give us a call today to find out how we can help you improve your ad campaigns.
Do you own or operate a fitness, gym or yoga studio?
Are you looking to fill your classes and attract repeat registrations for business like Karate, Spin, Yoga, Kickboxing or other fitness related classes?
Here are 5 Social Media Content ideas to help you create social media posts that will attract attention, grow engagement and get more people registered.
1. Use Video. I know, some people don’t like video and think it’s too much work to record and post. Truth is, it’s pretty easy, doesn’t take much time and doesn’t have to be perfect! Let me say that again. Your videos don’t need to be perfect!
Using video will allow you to share the experience your other clients have at your classes. Show them what it’s like to be at a class, show what types of exercises or what your bring that makes your classes unique.
2. Offer a free class for new clients. The best way to get new people in a class is to give a class away free. You can post that you have a limited number of spots…that also adds an element of urgency to get people to take action. Ask them to post a message on your post and/or tag a friend who they want to bring with. This is a great way to build brand awareness and encourage your loyal fans and followers to promote for you!
3.Share testimonials or before/after examples. It’s one thing for you to pitch that your class is an amazing experience, but having others’ share their experience makes it more authentic and more relatable. Find a few of your loyal and frequent clients and ask them if they would be willing to have you record a 15-30 second video clip of them sharing why they love your classes. As an added bonus you can alway offer them a free class for helping you out!
4. Share video demonstrations of exercises. The best way to demonstrate your experiences is by showing examples of exercises or a short training clip from a class. This helps people build trust with you. The more you share, the more people will identify with you as an expert in your field.
5. Contests, Discounts, Special Promotions! Think of creative ways to get your fans and followers to share your special offers to their fans. Consider offering package deals that you can promote on social with a limited time, for example buy 4 classes get the fifth free or bring a friend to a class, when they purchase a class you get one free. What offers can you think of that will build interest and excitement?
Try these ideas out and see what type of responses you get. Tweak and keep trying new things. Experiment and have fun with it.
If you need help with planning and organizing your social media strategy or are looking to have someone take on your social management so you can focus on your business, send me a message. I’d be happy to help you grow your business with creative ideas that build engagement and awareness for your business.
We have had some amazing results with Instagram Stories for our Real Estate Agent/Broker clients. One of the strategies we have taken with Instagram Stories is featuring current property listings or hot properties.
Why are stories so compelling?
When done in a creative way you can take your followers on a virtual trip through the property to see different elements of the listing and point out what makes the property unique. Remember to follow the typical “story” structure.
Every good story has a beginning, middle and an end.
When we feature listings for our clients we start with the outside of the home and add a catchy title for some text to that first story picture to catch people’s attention. Next we include 3-5 more pictures of different rooms or highlights of the property and add only a small amount of text on each image. The text usually points out something unique about the space in the home. It’s always recommended to try to help your audience connect with the picture, property or space.
Try to help them imagine themselves there. We recommend ending the story process with one last important call-to-action. Usually that call-to-action is to call the agent/broker for more info or more pictures of the property.
What we have found really works is to tie your call-to-action into sending a message via Instagram. Asking people to send a message is easy because the comment box is alway at the bottom of the story. It’s been amazing how much engagement this attracts.
How have you been using Instagram Stories to showcase your listings? Tell us below what you do to bring your listings to life.
Have you ever wondered how to check the results of Facebook Ads setup with “Dynamic Creative?
This valid feedback will tell you what Facebook has determined is the most effective combo of creative elements you selected in the setup of this ad type, based on the ad goals.
Why is this important? Read on to find out…
First of all, what is a “dynamic creative” ad?
When you are creating an ad with Facebooks Ad Manager, there is an option to setup your ad with “Dynamic Creative”. Simply put, instead of having to test one whole ad against another separate ad, with a different image or different headline or different text copy…what you can do is create one single ad and set it to have dynamic creative. And while you are creating that ad you can select and add multiple elements elements to include. Sound confusing? It’s not. Let me break it down for you.
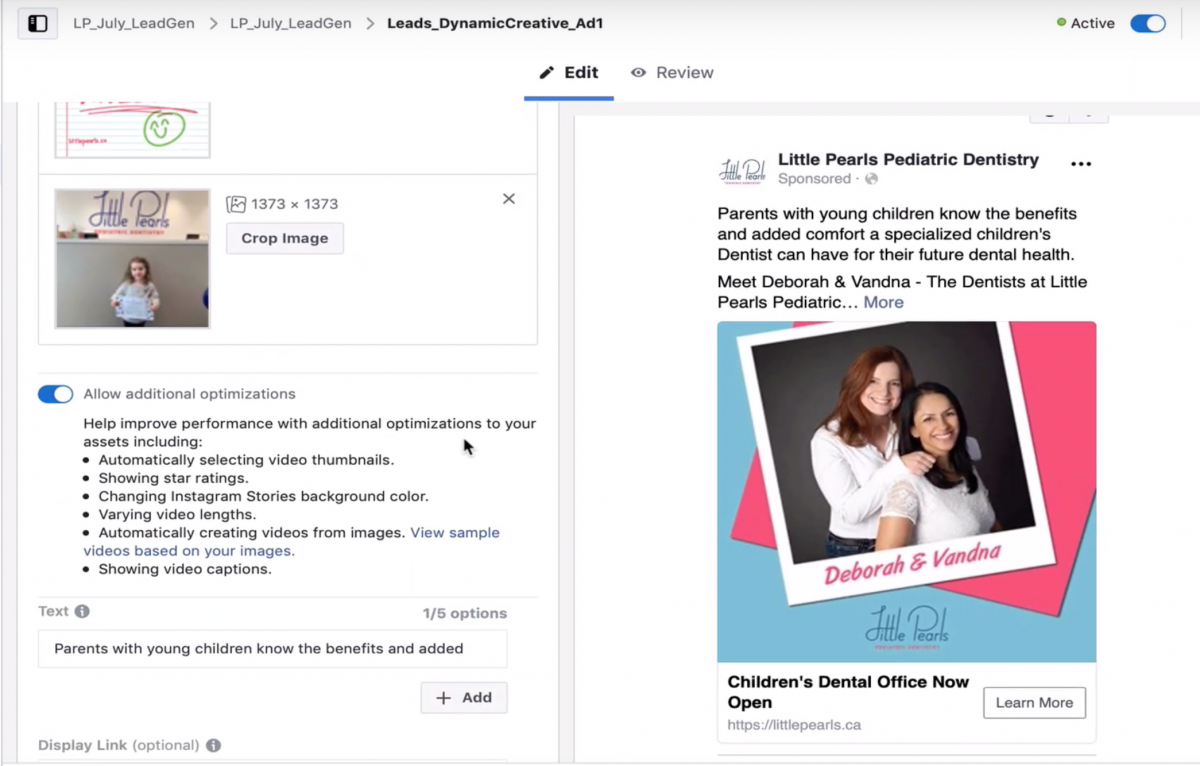
As an example, I was setting up an ad for a client that operates a Pediatric Dental Office.
In this ad, when I set it up, instead of setting up four different ads with four different images – running them within the same ad set and letting the Facebook algorithm choose which ad would run better, what I was able to do was to create one ad and in that ad I added four different images and 2 headlines.
Generally, even this is a lot of variations. I would recommend you do not include too many variations unless you have a large budget. In this example, I have a smaller budget that I’m working with and just let the ad run for a couple days before preparing this blog post and video.
As I have only run the ad for a couple days, I am not really giving the algorithm enough time and resources to figure it all out, but you can start to see results immediately. What essentially happens is that while the ad is being delivered, Facebook’s algorithmwill dynamically choose a different image, landing page url, different title, ad copy text, even different a different combination of call-to-action buttons to show your target audience. The algorithm will choose different variations and show it. Over time you can see how your ad is performing by reviewing ad performance stats in Facebook Ad Manager.
How Do You See The Results? How Do You Know What The Best Ad Setup Is?
Step 1
To see performance results you have to login to Facebook Business Manager and open up the Ads Manager.
You will need to select either the ad set level or the ad level within ads manager to see those results.
As a reminder, for this example I only have a small budget I’m running with in this example, and it’s only been running for about a day, maybe even less. While I would recommend letting the ad run for longer to allow the algorithm to work it’s magic and show you more concrete results, at this point you can already start to review some results.
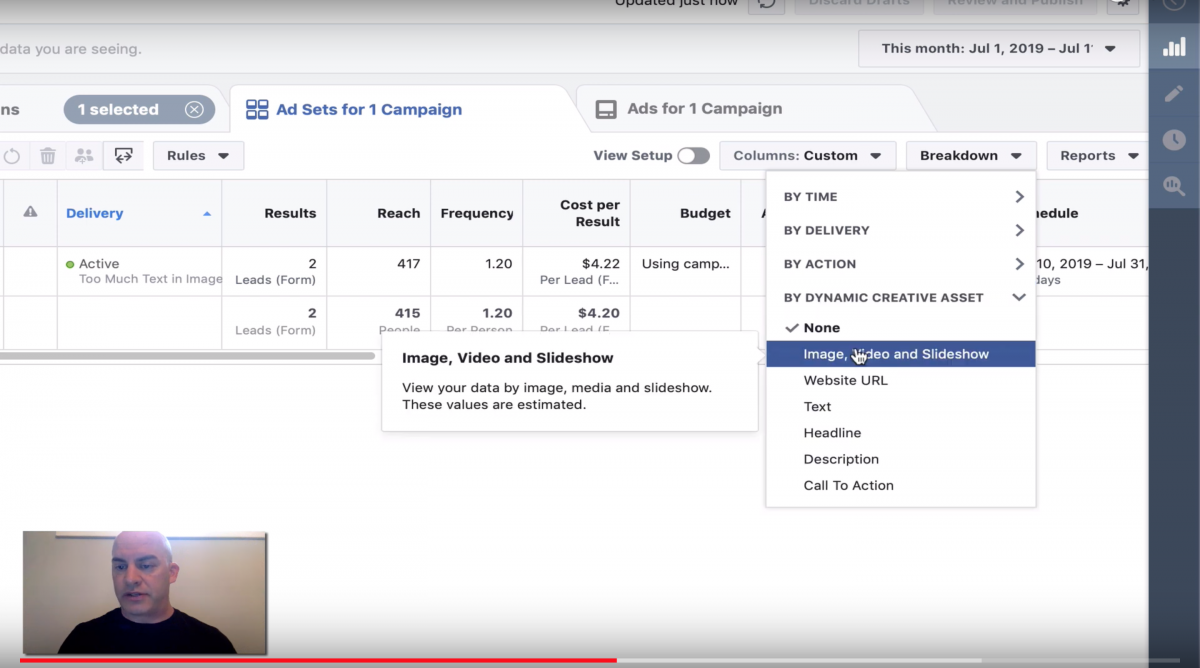
Step 2
In order to see the results you have to select the “breakdowns” menu tab and then select “by dynamic creative asset” and you will see several choices.
In the example above I’ve selected images as we have a test ad with 4 images.
One of the four images in this ad set I am planning to stop using as it is way too heavy in text. I wanted to test this image in this dynamic ad example to see what happens but, expected it would not perform as well as other images.
That’s exactly what the results show. Images with a high or too high (over 20% area of the image) amount of text will not get as much reach as other images. The algorithm will not show this image as often.
I can see that One of the images has already generated 2 leads. The goal of this ad type is to generate leads from a form right within the Facebook ad. This ad type does not take a user off the Facebook platform to a website landing page. The Lead Gen form is created as part of the ad and shown within the Platform or Facebook App.
By looking at a report like this, I can see which image is getting the most reach, review campaign results and determine which is best.
Ad frequency looks all great.
In this example, the timeframe is very short, the ad has only been running for a day, but I can already see results and if needed could make changes.
I can also look at which headline is performing better, as an example.
Why is this important?
In this case I’ve created this dynamic creative ad type to test results.
I can get an understanding of which image or headline is most effective in achieving the maximum results based on the audience I am targeting.
I could try the best performing ad image(s) and headline to a new audience to see if I get similar results without having to again test different variations of creative.
I now know what works. I can learn which picture converts most results based on the goal of the ad. I would know which of the two headlines I tested perform best.
The next time I want to test this ad, let’s say I want to test to another audience, instead of having to go thought the whole process of creating an ad with dynamic creative again. Now I know the one or two variations that work the best and can create an ad with those specific elements.What I learn from this dynamic creative test ad will help me identify which ad variables should perform best.
Summary
The next time you want to test multiple images, headlines and/or ad copy, consider trying an ad with Dynamic Creative as an alternate to testing multiple ad variations as individual ads within an ad set. It’s another opportunity to test overall results. It’s all about testing when it comes to Facebook and Instagram advertising and this gives you another way to learn what results work best.
—
Stay tuned for future videos and posts on How to setup the facebook pixel, how to create facebook audiences, how to use hashtags in Instagram and more.
Have you ever been scrolling through your social media feed and something caught your eye? What happens? You tap or hold your thumb on the screen and are visually engaged in that specific post.
This is commonly referred to as “thumb-stopping power”.
This blog post will cover 6 tips to help ensure your social post images catch attention and have thumb-stopping power. Plus, we’ve included a special bonus video for you below, a video demo of a free tool we use to create amazing images and graphics.
Tip #1 : Keep Your Corporate Branding In Mind
How recognizable are your images? Do they follow a style with consistent fonts and colours across all your posts? Do your images include your logo?
If your look, your style & your value is consistent, people will remember you. That’s one element of branding – being identifiable, recognizable and consistent. It all adds to that power of getting people to stop and take notice.
We recommend creating a branding guide that includes:
Details about your main corporate colours with both their Hex as well as RGB colour codes,
Include the names of 2+ different fonts you will always use, and
Include file names for various logo files.
The idea here is to have a document of reference for you or other members of your team to always refer to and have easy access for any new graphic you create. This will be a huge timesaver and ensure you have brand consistency.
Tip #2 : Add Text With Images – But Not Too Much
To make your images punch and to capture attention, consider adding a short phrase or attention grabbing sentence on top of your images.
Make sure the text is readable. Putting white text on top of the white part of an image will make the text hard to read. So always make sure you can read the text. It sounds obvious but I’ve seen so many people use images with text and part of the copy is unreadable. You may need to add a solid or transparent background behind text to make it punch better.
Consider placing the text in a spot of the image that will get noticed.
Don’t make the text too large. If it’s too big and covers too much of the actual image, you won’t benefit from the eye-catching potential of your image.
Tip #3 : Lighting, Positioning and Setting Make A Big Difference For Photos/Selfies
It sounds obvious, but make sure people can clearly see faces! I can’t tell you how many times I’ve seen pictures where people’s faces are cropped or not entirely visible.
Lighting makes a huge difference in the success of your “thumb-stopping power”. Make sure your pictures is well lit. Many apps have various filters that can help brighten or adjust the original photo and improve it greatly. Lighting and app filters can make a world of difference to the quality of an image.
Lastly, keep your background de-cluttered! No Instagram user wants to get overwhelmed by your photo.
Tip #4 : Check Your Focus
No one wants to see a blurry or out-of-focus photo – Great photography requires a steady hand.
When taking a photo on your phone, tap the screen to focus and try not to shake your hand.
You can lean your phone against something, or invest in a tripod.
Again… make sure you have good lighting
Get closer to your subject and isolate it from background clutter to make it the center of attention.
Tip #5 : Patterns
The human eye is naturally attracted to shapes and patterns. If your brand allows it, incorporate bright patterns into your images.
You can also create a pattern in the way you frame your photo. Consider the foreground and background of objects in view. Consider how various objects are balanced in your image.
Sometimes it even takes looking at a particular situation from different angles. Take a few pictures from different angles and distances and see what works best.
Tip #6 : Go Black & White
Switch up the colour options.
Without a doubt, there’s a ton of colour on social media. Right? Switch it up. Try using black and white images. Scrolling through tons of colour in a feed and then seeing black and white will for sure have your followers stop their scroll!
Creating thumb-stopping images takes visualization, personalization and experimentation. If you post something and it doesn’t get a ton of engagement, look at the analytics; ask yourself “Why?” and re-read this blog!
Above all, one of the biggest takeaways from this blog post should also be empathy. Upon creating images for social media, put yourself in other people’s shoes and be authentic.
Do your images follow a consistent and recognizable structure?
Have you included text, where beneficial?
Is your image clear or have a unique balance or pattern?
Does your image stand out in some way?
Follow these tips consistently and see if you have been able to help your posts get more attention and engagement. Check your analytics, poll your audience. Let us know in the comments if you have other ideas and suggestions.
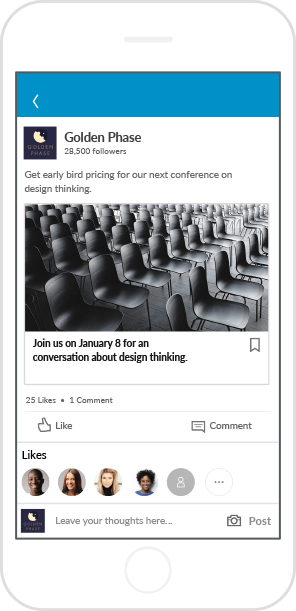
LinkedIn has grown to be a professional place to connect, network, find a career and share!
Whether you’re a business owner or employee, LinkedIn will build a community, and help drive your company’s growth through meaningful conversations.
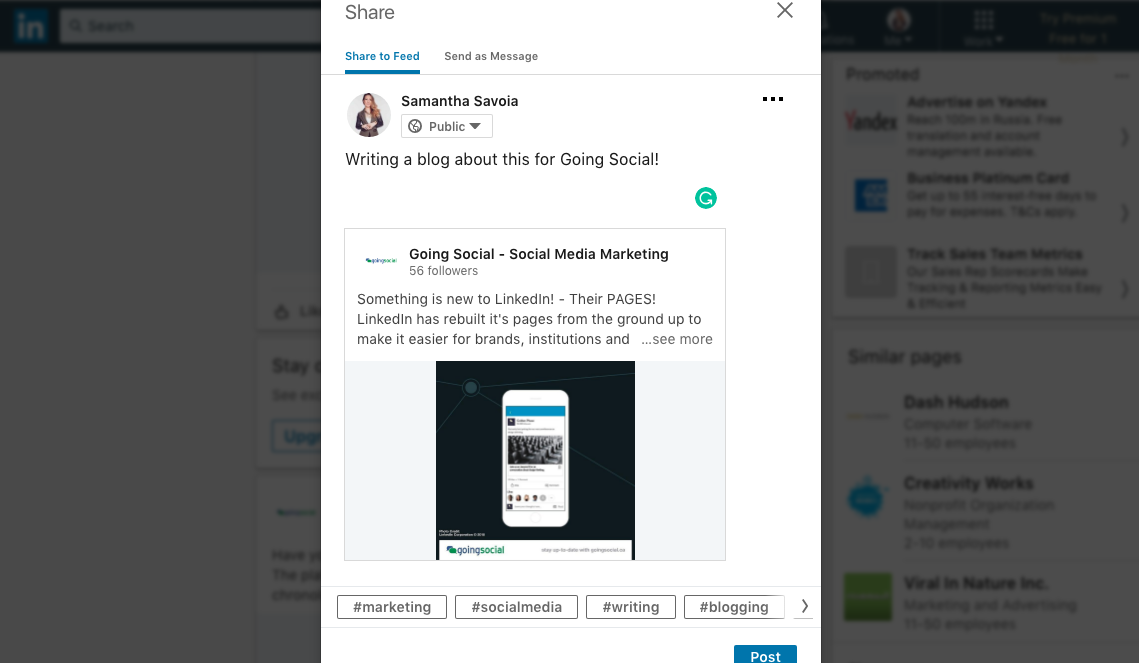
If you’re a constant user, you may have noticed something new about LinkedIn. The business platform announced a revamp from the ground up, to make it easier for brands, institutions and organizations to foster constructive conversations with LinkedIn’s community. They’re calling this the next generation of LinkedIn Company Pages.
If you own a company page, you’ll know to run it, you need to be an admin of that page and since admins are backbone of the company page and social strategy, LinkedIn Pages now gives them tools they need to foster daily interactions with their community.
One of the best parts about the update is that LinkedIn Pages’ management is now fully integrated and functions with its mobile app. Admins can now post updates and respond to comments and maintain their company presence on the go from the LinkedIn mobile app. Admins can also share Word Docs, PDFs and Powerpoints to tell a more compelling story.
With all the limitations before the update, this was a huge issue and challenge.
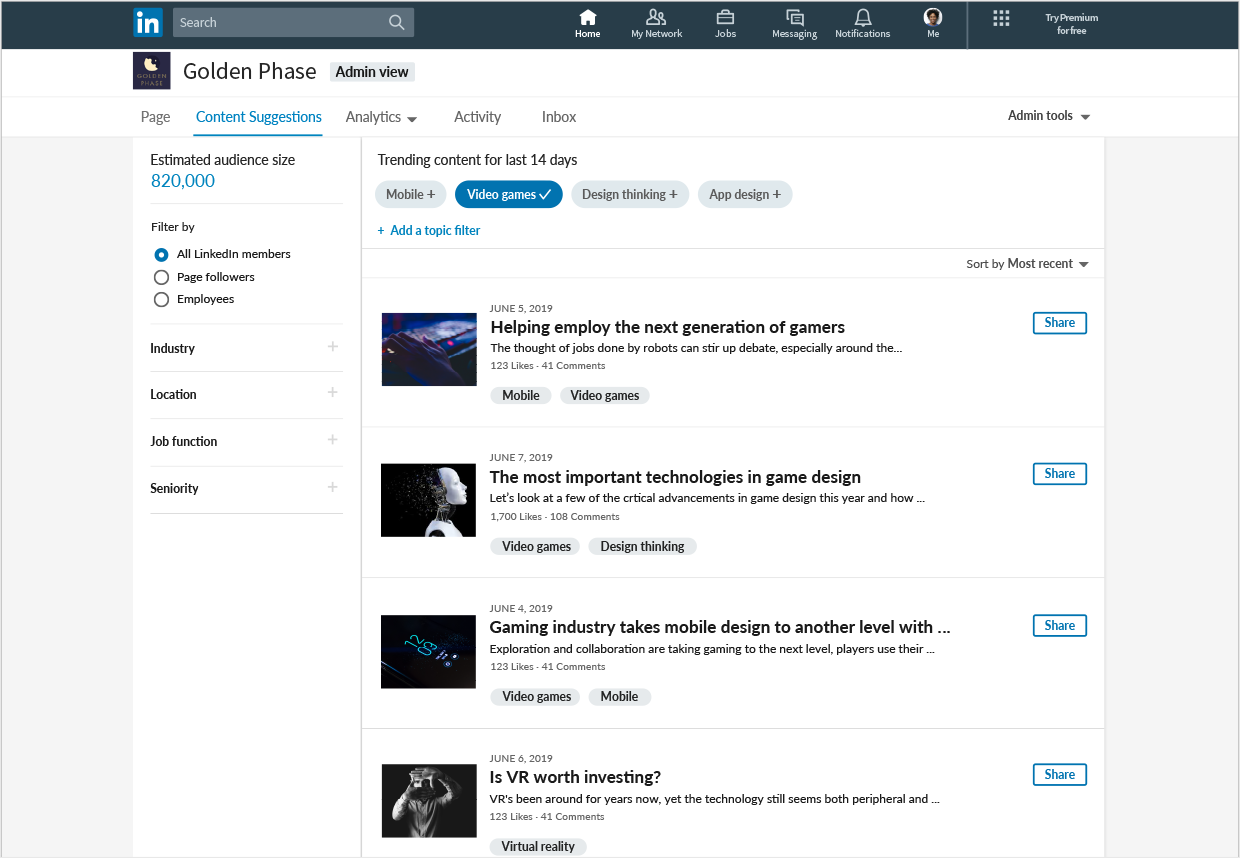
As an admin of a Page, LinkedIn will allow you to listen in and respond to conversations happening about their brand or relevant topics simply with hashtags and “suggested content”. The way you share content on Facebook is the same way you can share content on LinkedIn. The Pages platform wanted to facilitate employee advocacy with the new options to discover and reshare your employees public posts from your page; like customer testimonials, product reviews, etc.
This lets companies showcase conversation that people are having about them and helps build their brand.
“At LinkedIn, we believe that Individuals make up a business, but it’s the community that brings them all together.” – Sparsh Agarwal, of LinkedIn
LinkedIn started rolling out the new Pages experience in the US and will make it available worldwide very soon!
So what do you think? Better improvement? Will you be using LinkedIn Pages more?